Best Sauna for Basement (2026): Ventilation, Moisture, and Code Done Right
How to put a sauna in your basement without creating a moisture problem. Ventilation, drainage, code, and the best sauna types for basement installation in 2026.
Quick answer: A basement is one of the best places for a home sauna because of the concrete slab and stable temperature. The risk is moisture. Infrared is the low-risk default. A traditional sauna works well too, but only with a real vapor barrier, dedicated ventilation, and a plan for the water that leaves the room.
Best for
Homeowners with a finished or semi-finished basement who want a permanent sauna without building an outdoor structure.
Wrong fit
Anyone with a chronically damp basement, frequent water intrusion, or no path to run a vent to the outside.
Tradeoff
The basement gives you the best foundation and the most stable temperature of any indoor space, but it is also the least forgiving place to get moisture control wrong.
The basement is quietly the best room in the house for a sauna. It already has a concrete slab, it stays cool and stable year round, and it is usually out of sight so the build does not have to win a design argument.
The catch is moisture. A basement is a closed box below grade. Anything you do wrong with humidity does not blow away. It sits in the framing and turns into mold. Get the moisture plan right and a basement sauna will outlast everything else in the house. Get it wrong and you have an expensive remediation project.
Here is how to do it right.
Quick comparison: basement sauna types
Type
Power
Moisture risk
Ventilation need
Best for
Infrared cabin
120V standard outlet
Very low
Light
Easiest, lowest-risk basement install
Traditional electric
240V dedicated circuit
Moderate to high
Mandatory, ducted
The real sauna experience
Steam-capable traditional
240V dedicated circuit
High
Mandatory plus drainage plan
Buyers who want full löyly and will build for it
Infrared: the low-risk default for a basement
If you want a basement sauna with the least chance of a moisture problem, infrared is the answer.
An infrared cabin runs on a standard 120V outlet, so no electrician and no dedicated circuit. More importantly, it produces almost no humidity. There is no water on rocks and no steam, so the basement air stays dry and the framing around the cabin stays safe.
The tradeoff is the same one it always is. Infrared tops out around 140 F with no steam. If you have used a hot Finnish sauna, infrared is a different category of experience. For the full breakdown, read infrared vs traditional sauna.
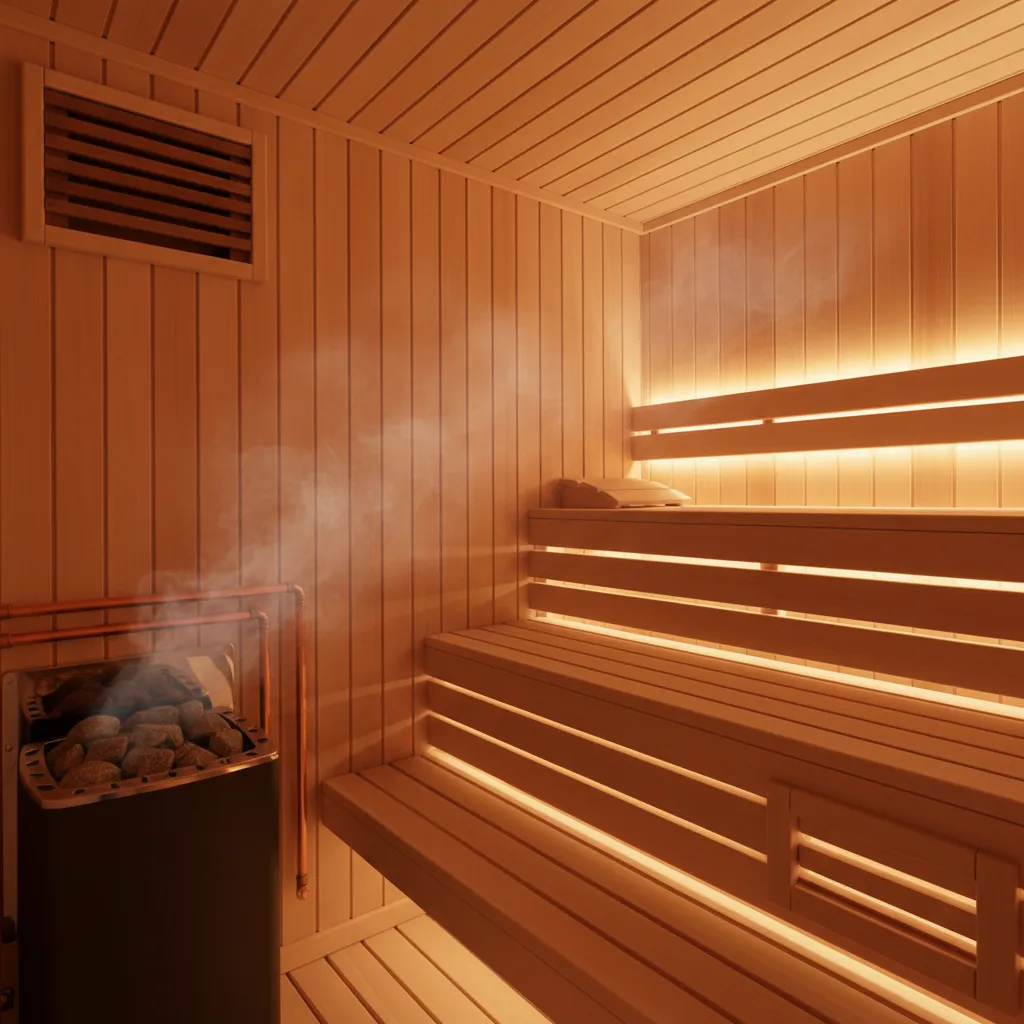
Traditional electric: real heat, but build for the water
A traditional electric sauna in a basement delivers the full experience, and the stable below-grade temperature actually makes it efficient to run. But a traditional sauna puts water into the air on purpose, and a basement has nowhere for that water to go unless you give it a path.
Three things are non-negotiable:
A continuous vapor barrier on the warm side of the insulation. Foil-faced, sealed at every seam. This is what keeps humid sauna air out of your basement walls.
Dedicated ventilation ducted to the outside. Not just a vent into the rest of the basement, which only moves the moisture problem. Intake low near the heater, exhaust high on the opposite wall, exhausting outdoors.
A 240V dedicated circuit. 30 to 60 amps depending on heater size. Licensed electrician only. See the sauna electrical planning guide.
This is where basement sauna projects succeed or fail. Do this work before you shop.
1. Confirm the basement is dry to begin with
Run a dehumidifier for a week and watch it. If your basement already has a humidity problem, a sauna will make it worse, not cause it. Fix water intrusion, grading, or a failing sump before you add a sauna. A sauna in a damp basement is a mold project waiting to happen.
2. Find the vent path
Walk the basement and find where a duct can reach an exterior wall or rim joist. If there is no realistic path to vent a traditional sauna outdoors, that decides it for you: go infrared, or move the project to a garage or backyard.
3. Check the electrical panel
Open the panel, count free breaker slots, note the total amperage. Older 100-amp panels often cannot take a 240V sauna circuit without a panel upgrade, which alone can run $1,500 to $3,000. Know that number before you commit. Infrared usually avoids this entirely.
4. Assess the slab and ceiling height
Concrete slab is the ideal sauna floor. It handles heat, weight, and moisture without complaint. Confirm you have at least 7 feet of clear height after any sub-floor or ceiling finish. Sauna benches need headroom on the upper bench.
5. Plan the drain
For any traditional or steam build, decide where rinse and cleaning water goes. A nearby floor drain is ideal. Without one, you are mopping by hand and a small slope toward an exit matters.
6. Call the building department
Many municipalities require a permit for the electrical work and sometimes for the sauna itself. Egress and combustible-clearance rules can apply in a finished basement. A five-minute call now is cheaper than an inspection failure later. The indoor sauna installation checklist covers what inspectors typically look for.
Common mistakes that cost basement sauna owners money
Venting into the basement instead of outside. This is the single most expensive mistake. A vent that dumps humid air into the rest of the basement just relocates the mold risk. Duct to the exterior.
Skipping or puncturing the vapor barrier. Every gap is a place for moisture to enter the wall cavity. In a sealed basement it does not dry back out.
Building over an undiagnosed water problem. A sauna does not cause basement water issues, but it will accelerate the damage from one you ignored.
Choosing traditional with no vent path. If you cannot duct outdoors, do not force a traditional build. Infrared exists for exactly this situation.
If you want the lowest-risk basement sauna, go infrared. Standard outlet, almost no moisture, done in a weekend.
If you want the real sauna experience and your basement has a realistic vent path and a dry baseline, a traditional electric build is excellent down there. The stable temperature makes it efficient. Just build the vapor barrier and the ducted ventilation as if your house depends on it, because it does.
Either way, confirm the basement is dry before you spend a dollar on a cabin.
FAQ
Is a basement a good place for a sauna?
Yes, often the best indoor option. The concrete slab is an ideal sauna floor and the stable below-grade temperature makes the heater efficient. The only real risk is moisture, which is fully manageable with a vapor barrier and ducted ventilation, or avoided entirely by choosing infrared.
Will a sauna cause mold in my basement?
A correctly built sauna will not. Mold comes from humid air reaching cold framing, which a continuous vapor barrier and outdoor-ducted ventilation prevent. The real danger is building a traditional sauna over a basement that already has a moisture problem. Fix that first.
Do I need to vent a basement sauna outside?
For a traditional sauna, yes. Venting into the rest of the basement only moves the humidity somewhere else in the same sealed space. Infrared saunas produce almost no moisture, so they need only light airflow and no exterior duct.
Infrared or traditional for a basement?
Infrared if you want the lowest-risk, lowest-cost install on a standard outlet. Traditional if you want real heat and steam and your basement has a vent path to the outside and a dry baseline. See infrared vs traditional sauna for the full comparison.
What ceiling height do I need for a basement sauna?
Plan for at least 7 feet of clear height after any finished ceiling or sub-floor. The upper bench is where you sit in the heat, and it needs headroom. Tight basements can still work with a single-bench layout.
These guides are built from manufacturer documentation, public specifications, primary research where health claims matter, and repeated buyer questions that show up in real ownership and installation decisions.
Manufacturer responses can clarify pricing bands, warranty terms, support footprint, or common mistakes. They do not move a page up the shortlist on their own.