Sauna Guide
Barrel Sauna Insulation: Materials, Methods, and Cold-Climate Tips
Learn where barrel saunas lose heat, which insulation materials work best, and how to keep yours hot in freezing winters.
Your barrel sauna heats up fast in August. In January, it barely holds 150 degrees F while the heater runs full blast. The difference is not the heater. It is the walls.
Barrel saunas are single-wall construction. One and a half to two inches of solid wood between you and the weather. In mild climates, that is enough. In cold climates, below about 10 degrees F, it is not. Heat escapes faster than the heater can replace it, sessions take forever to get going, and your electricity or firewood bill climbs.
Do barrel saunas need to be insulated? Not always. If your winters stay above 20 degrees F, a well-built barrel with tight stave joints will perform fine. But if temperatures regularly drop below 0 degrees F, insulation is the single most effective upgrade you can make. It cuts heat-up time by 30 to 50 percent and lets the sauna hold 180 degrees F or higher even in deep cold.
This guide covers where to insulate, what materials to use, and which approach gives you the biggest return for the least effort.
TL;DR
- End walls are the biggest heat loss point. Insulating them takes 2 to 4 hours and makes the most noticeable difference.
- Floor insulation is often overlooked but eliminates the cold draft at foot level.
- Between-stave insulation is risky. It traps moisture and can cause rot. Skip it unless you know exactly what you are doing.
- Best materials: Mineral wool (R-13 to R-15 in 3.5 inches), ceramic fiber blanket for tight spaces, reflective foil as a radiant barrier.
- Expect to spend: $100 to $400 in materials depending on scope.
Where Barrel Saunas Lose Heat
Not all surfaces lose heat equally. Understanding the weak points saves you from insulating everything when one targeted upgrade might solve the problem.
End Walls (Biggest Culprit)
The flat end walls on a barrel sauna are typically the thinnest part of the structure. Many manufacturers use tongue-and-groove boards between 3/4 inch and 1.5 inches thick. Compare that to the curved staves at 1.5 to 2 inches. The end walls also have the largest continuous flat surface area facing the wind, which accelerates conductive heat loss.
If you only insulate one thing, insulate the end walls.
The Door
A poorly sealed door bleeds heat constantly. Before adding insulation anywhere, check your door seal. Hold a lit match or lighter near the door edges with the sauna running. If the flame flickers, you are losing significant heat through gaps. New weatherstripping costs $10 to $25 and takes 20 minutes to install.
The Floor
Cold rises from the ground through the bottom staves. In a barrel sauna, the lowest staves sit closest to frozen ground or a cold gravel pad. Your feet feel this first, but the effect pulls down the temperature of the entire lower half of the sauna. For more on this, see our outdoor sauna winter prep checklist.
The Staves (Least Concern)
The curved staves are actually the best-performing part of a barrel sauna. The round shape means smaller interior volume and natural convection that keeps hot air cycling efficiently. The solid wood provides reasonable R-value (about R-1.25 per inch for cedar). Insulating between staves is possible but introduces moisture risks that often outweigh the thermal benefit.
Insulation Materials That Work in a Sauna
Not every insulation material belongs near a heater running at 190 degrees F. Some off-gas toxic fumes at high temperatures. Others absorb moisture and create mold problems. Here is what actually works.
Mineral Wool (Rockwool / Stone Wool)
The best all-around choice for sauna insulation. Mineral wool is non-combustible, handles temperatures well above 400 degrees F, does not absorb moisture, and provides excellent thermal resistance at R-3.7 to R-4.2 per inch.
- R-13 batts (3.5 inch) fit standard framing cavities
- R-8 batts (2 inch) work for shallower cavities on end walls
- Cost: $0.50 to $1.00 per square foot
- Where to buy: Any building supply store. Rockwool ComfortBatt is widely available.
Ceramic Fiber Blanket
A thin, flexible insulation that tolerates extreme heat (rated to 2,300 degrees F). Useful where you do not have room for thicker batts. Provides roughly R-1 per quarter inch. Not as effective per thickness as mineral wool, but it fits where mineral wool does not.
- Best for: Tight spaces behind end wall panels, wrapping around the stove area
- Cost: $30 to $60 for a roll that covers 24 square feet
- Handling note: Wear gloves and a dust mask when cutting. The fibers irritate skin and lungs.
Reflective Foil Barrier
Aluminum foil radiant barrier reflects infrared heat back into the sauna. This is not a substitute for bulk insulation, but it is a powerful addition. In a sauna, a large portion of heat transfer is radiant (from the stove and hot surfaces), not just convective. A foil barrier behind the interior paneling can reflect 95 percent of radiant heat.
- Best for: Lining end walls and ceiling areas behind wood paneling
- Cost: $0.25 to $0.50 per square foot
- Installation note: Leave a minimum 3/4 inch air gap between the foil and the interior wood paneling. Without the air gap, the foil conducts heat through contact and loses its reflective benefit.
What NOT to Use
- Fiberglass batts with kraft paper facing. The paper facing can char or ignite near the heater. If you use fiberglass (less ideal than mineral wool), use unfaced batts only.
- Spray foam (closed or open cell). Off-gasses at sauna temperatures. Also traps moisture in a way that is difficult to inspect or repair. Avoid it entirely.
- Polystyrene / XPS / EPS boards. Melting point is too low. These deform and release toxic fumes at sauna temperatures.
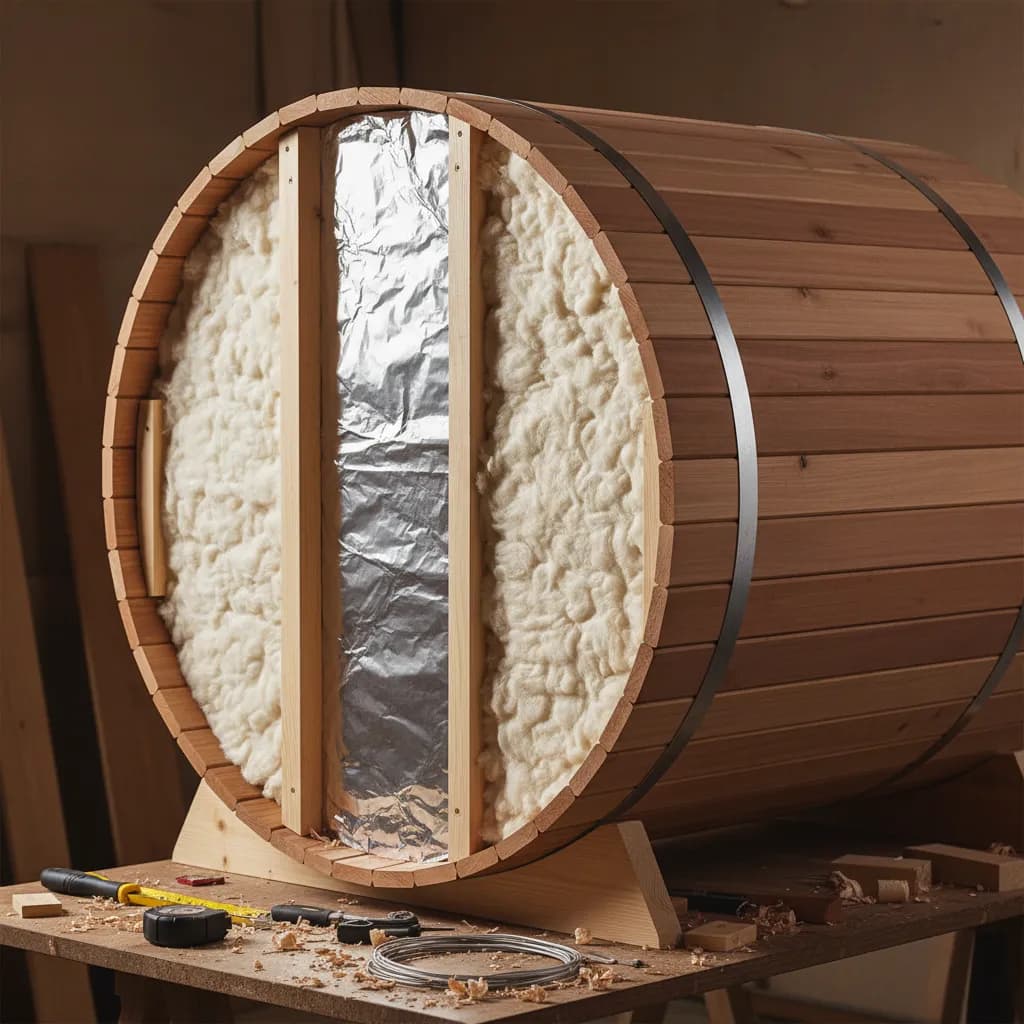
How to Insulate Barrel Sauna End Walls
This is the highest-impact project. Budget 2 to 4 hours per end wall and $50 to $150 in materials.
What You Need
- Mineral wool batts (R-8 or R-13 depending on cavity depth)
- Reflective foil barrier
- Cedar or spruce tongue-and-groove boards (for interior paneling)
- 1x2 or 1x3 furring strips
- Stainless steel screws (standard steel rusts in sauna humidity)
- Utility knife, tape measure, drill
Steps
1. Remove interior end wall paneling. Most barrel saunas have a removable interior panel on each end wall. Some are screwed, some are friction-fit. Take photos before you start so you remember the layout.
2. Frame the cavity. If there is no framing behind the end wall paneling, add furring strips in a grid pattern. This creates a cavity for insulation and provides something to attach the new interior paneling to. Use 1x2 strips for a shallow cavity (fits R-8) or 1x3 for a deeper one.
3. Cut and fit mineral wool. Cut batts to fit snugly between the furring strips. Mineral wool is easy to cut with a serrated knife or bread knife. Press it in firmly but do not compress it. Compressed insulation loses R-value.
4. Add reflective foil. Staple foil barrier over the insulation and furring strips, shiny side facing inward (toward the sauna interior). Overlap seams by 2 inches and tape them with aluminum foil tape. Not duct tape. Aluminum tape.
5. Reinstall paneling with an air gap. Attach the interior paneling over the foil using stainless steel screws into the furring strips. The furring strips naturally create the air gap you need between the foil and the wood.
The door-end wall is trickier because of the door frame. Insulate around the frame as completely as you can, but do not block the door's swing or compress the weatherstripping.
DIY Barrel Sauna Floor Insulation
The floor is the second most effective area to insulate, and the most frequently ignored. Cold feet ruin an otherwise good session.
Under-Barrel Approach
If your barrel sauna sits on cradles (the curved supports), you have access to the underside.
1. Measure the flat bottom area. On most barrels, this is 2 to 3 staves wide.
2. Cut rigid mineral wool boards (not the fluffy batts) to fit the underside between the cradles. Use 1.5 to 2 inch thick boards.
3. Attach with stainless steel strapping or wire. Run metal straps across the bottom and fasten to the cradles. The insulation should press against the bottom staves without gaps.
4. Protect with a moisture barrier. Wrap the insulation in a breathable housewrap (like Tyvek) to keep rain and splash-back from degrading it. Do not use solid plastic. It traps moisture against the wood.
Interior Floor Option
If you cannot access the underside, add insulation on top of the existing floor.
- Lay down 1/2 inch ceramic fiber blanket on the floor
- Cover with cedar duckboards (slatted floor mats)
- The duckboards lift your feet off the cold surface and allow air circulation underneath
This is less effective than exterior insulation but noticeably warmer underfoot. It also adds about 1/2 inch to the floor height, which is not an issue in most barrels.
Between-Stave Insulation: Proceed With Caution
This comes up constantly on Reddit, and the consensus is clear: it is risky. Here is why.
Barrel sauna staves are designed to expand and contract with humidity and temperature. They swell when wet, shrink when dry, and the metal bands hold everything tight through those cycles. Insulation between the staves interferes with this movement and can trap moisture against the wood, which leads to rot from the outside in.
When It Can Work
If your barrel has a double-wall design (some premium models do), the manufacturer has already accounted for an insulation cavity. In that case, fill the cavity with mineral wool as intended.
When to Skip It
If your barrel is single-wall construction, which is the vast majority, do not try to add insulation between the staves. The end walls and floor will give you 80 percent of the benefit with none of the rot risk.
What to Expect After Insulating
Real-world numbers from barrel sauna owners who insulated their end walls and floor:
| Metric | Before | After |
|---|---|---|
| Heat-up time (0 degrees F outside) | 55 - 70 min | 30 - 40 min |
| Max temperature | 150 - 165 degrees F | 180 - 200 degrees F |
| Heat retention after heater off | 10 - 15 min | 25 - 35 min |
| Monthly electric cost (winter) | $80 - $120 | $50 - $75 |
These numbers vary by heater size, barrel dimensions, and how cold your winters get. But the pattern holds. Insulated end walls alone typically cut heat-up time by a third and raise the achievable temperature by 20 to 30 degrees F.
Common Mistakes to Avoid
Using the wrong fasteners. Standard steel screws and staples rust within months inside a sauna. Use stainless steel for everything. It costs more. It is worth it.
Sealing the barrel too tightly. A sauna needs ventilation. Fresh air intake near the floor, exhaust near the ceiling. If your insulation project blocks these airflow paths, you get stale air and excess moisture buildup. Maintain your intake and exhaust openings.
Ignoring the door seal. Insulating walls while ignoring a leaky door is like winterizing your house with a window open. Check and replace the door weatherstripping first. It is the cheapest fix and sometimes the only one you need.
Compressing insulation to make it fit. If the cavity is 2 inches deep, use R-8 batts, not R-13 stuffed in. Compressed insulation loses its air pockets, which are what actually provide the thermal resistance.
Skipping the vapor barrier placement check. In a sauna, the foil/vapor barrier goes on the warm side (facing the interior). This prevents moisture from condensing inside the wall cavity. Reversed placement causes condensation problems that are invisible until the damage is done.
Should You Insulate or Buy a Cabin Sauna Instead?
If you already own a barrel sauna, insulation is a straightforward and cost-effective upgrade. A $200 end wall project can transform cold-weather performance.
But if you are still shopping and you live in a climate where temperatures regularly hit -10 degrees F or lower, consider whether a cabin sauna is the better fit from the start. Cabins have full insulation cavities built in, hold heat more efficiently in extreme cold, and avoid the structural compromises of retrofitting a barrel.
For a broader look at your options, our DIY vs kit vs pre-built guide breaks down the full decision.
Final Thoughts
A barrel sauna in cold weather is not a lost cause. It just needs a little help where it matters most. Insulate the end walls, seal the door, address the floor, and you have a sauna that performs in January the way it does in July.
The whole project costs less than a single month of a gym membership and takes a weekend. And the payoff is not just better numbers on a thermometer. It is longer sessions, deeper heat, and the kind of winter sauna experience that makes the cold outside feel like a feature, not a problem.
Close the door. Let everything go.
Thinking about a home sauna? Get our free buyer's guide: what it actually costs, what actually matters, and what everyone gets wrong. No sales pitch. Send me the guide.
Methodology
These guides are built from manufacturer documentation, public specifications, primary research where health claims matter, and repeated buyer questions that show up in real ownership and installation decisions.
Manufacturer responses can clarify pricing bands, warranty terms, support footprint, or common mistakes. They do not move a page up the shortlist on their own.
Related Guides
Buying Guide • Barrel Sauna
Best Barrel Sauna (2026): Which Brands Are Actually Worth the Money
An honest comparison of the best barrel saunas in 2026. SaunaLife, Dundalk, Almost Heaven, and the brands to avoid. Real specs, real tradeoffs.
Barrel Sauna • Cabin Sauna
Barrel Sauna vs Cabin Sauna: Which Outdoor Sauna Is Right for You?
Barrel sauna or cabin sauna? Side-by-side comparison of cost, heat-up time, capacity, durability, and climate performance to help you choose.
Buying Guide • Cold Climate
Best Sauna for Cold Climate Buyers (2026): What Holds Up In Real Winter
The best sauna options for cold-climate buyers in 2026. Honest picks for winter performance, insulation, outdoor durability, and heater-first setups.
Thinking about a home sauna?
Get our free buyer's guide. Real costs, real reviews, zero sales bias.
Just starting your sauna research?
Real costs, real reviews. One email, no spam.
Already got a quote? Get a free read on it